Feb 14, 2020
成长日记
根据下图所示的文字绘制

要去除最后一行的行间距,就需要整体的高度减去最后一行的 rect.bottom - descent 这个值。核心逻辑如下:
1 | private fun calculateExtraSpace(): Int { |
2020/02/18
关于 textView 中 measure 错误的 bug 分析
现象是在某些情况下,textView 的高度与内容的高度不一致,导致显示不完全,页面刷新重新绘制后就好了
看了网路上一篇文章的大概分析,主要的代码为 textview 中关于 setText 方法调用后,有没有触发 requestLayout 方法(这个方法中会调用控件的 onMeasure方法和 onLayout 方法,重新测量),核心方法是 textView 的 checkForRelayout()这个方法中的判断,如果控件的宽度为 wrap_content 的话,会直接调用,大概的判断逻辑如下:
1 | /** |
所以暂时将控件的宽度修改为 wrap_content 来解决,但是该问题没有完全找到复现的原因,这是猜测,后续可以进行 demo 复现,还有一点思考的是只有这个地方出现了这种情况,测试的环境是弱网的特别容易复现
2020/02/19
使用 EpoxyModelGroup 时动态改变 items 的问题
在分离了动态流中一个动态的各个部分后,为了复用,使用 EpoxyModelGroup 来实现的转发动态的展示,但是不同类型的转发动态展示的 item 不一样,造成 items 的改变,然后就给报错了,看了 EpoxyModelGroup 的类注释,因为它在第一次使用的时候,会根据第一次传入的 items 的 Model 来加载对应的布局,所有后面无法动态改变,所以要实现加载不同转发类型的 item,就只有将所有的类型罗列出,并按照一定的顺序排列,依次加载响应的布局,如果不需要显示,就生成空的 item(但是这个 item 的类型要和需要显示的一致,这样加载的布局才会是正确的),然后调用 hide()方法
2020/02/21
使用 ViewStub 加载布局的坑
使用 ViewStub 加载布局时,cardView 会失效,具体的原因没有深入源码研究
viewModel 死掉的原因分析
之前一直有偶发性造成 viewModel 假死的情况,已知的是如果用来保存 state 的 Store 在分发订阅时,如果 block 中的代码出现了异常,会造成该线程死掉。分析了 RealMvRxStateStore 的代码后发现,该类只会在初始化时进行一次线程的订阅,如果这个订阅的子线程发生了错误,造成线程死掉,后续的操作就无法再唤醒这个线程了,具体造成线程死掉的代码还没有分析到(为死掉后包括 throw 的异常都无法抛出),目前的解决方法就是,增加一个标志位,在线程死掉后,再次增加事件时,会重新订阅。这种处理方法有不妥的地方就是,这次失败的订阅无法回调给上层,需要后续有一次操作来触发重新订阅
后记:最后是暴露出来了一个 callback,用于回调处理发生错误时的后续
2020/02/24
animation 在部分手机上存在掉帧的情况
TODO :这个在小米手机上很明显,即使是使用线性插值器,中间有一段的数据回调会突然陡增然后恢复,这种情况目前没有测试出原因是什么
2020/03/05
关于 kotlin 中的泛型
- **out ** 关键字:等同于
Java中的? extend,上界通配符,在泛型中允许泛型的子类赋值 - **in **关键字:等同于
Java中的? super,下界通配符,在泛型中允许泛型的父类赋值
如果需要在泛型中确定某一个泛型的类型,需要使用类型擦除
1 | inline fun <reified T : BaseSysExtraDataBean> getExtraBean(): T? { |
在上诉代码中,通过使用 inline和reified来实现 Kotlin 中的类型擦除
This 指针逃逸
TODO:在阅读到并发编程的对象的共享章节时,书中举例了关于 this 逃逸的案例,不太明白,需要理解
Kotlin调用 Java 中的方法可见性的问题
今天使用 Kotlin 调用一个 Java 接口时,实现其方法报错了,错误是'public' function exposes its 'public/*package*/' parameter type 因为在 Java 中的可见性和 Kotlin 不一样(Java 默认是 default,而 Kotlin 默认是 public),所以需要把报错的 class 显示修改为 public
2020/03/08
cannot inline bytecode built with jvm target 1.8 into bytecode that is being built with jvm target 1错误解决方案
1 | android { |
getLocationInWindow 和 getLocationOnScreen 两个方法的区别
顾名思义,前者为获取控件在窗口中的坐标,后者为获取控件在屏幕中的坐标,计算窗口内的坐标时,如果没有特殊设置,不会包含顶部状态栏,实际上计算的就是 activity 顶层 view 内的坐标,而计算屏幕的坐标就是以屏幕为坐标系来计算的
2020/03/11
关于事件分发的理解
所有的事件都是由 DOWN 事件开始,由UP结束,中间夹杂一系列MOVE或者POINTER_DOWN的事件,所以在进行事件的分发处理时,如果要子 View 对对应的事件做出一定的响应,那么需要根据响应事件所需要的基本事件进行分发,比如,Click事件,在某些区域响应点击事件,那么首先 DOWN 事件都得分发下去,以便子 View 对后续的事件的判断,然后再根据UP的点击区域判断,是否需要将UP事件分发还是由自己进行处理
2020/03/13
Flutter wait for another ……问题解决方案
首先到SDK/bin/cache/目录下,删除lockfile,然后回到项目中,运行Flutter doctor
2020/03/16
实现 recyclerview 的分组吸顶效果和分割线的大体思路
可以通过继承ItemDecoration来实现,我这里的主要思路是,将数据源中,分组的第一项设置为一个单独的Item,然后在自定义的ItemDecoration中获取该Item 会非常方便了。
1.分割线的实现
分割线的实现分为简单的增加分离距离和自定义分割线:
前者只需要重写getItemOffsets,根据获取当前的 Item 来获取 Item的位置parent.getChildAdapterPosition(view),其中的parent和view都是回调返回的变量。然后 设置不同的间距即可(设置OutRect)简单示例:
1 | override fun getItemOffsets( |
如果还要实现自定义的分割线效果,除了上诉一样将间距分开后,还需要重写onDraw(c: Canvas, parent: RecyclerView, state: RecyclerView.State)方法来具体绘制每一个 Item的分割线,这个方法中会回调回来Canvas对象,可以用它进行各种的自定义绘制,示例:
1 | // recyclerview 每一次的绘制都会回调,例如滑动时 |
2.吸顶效果的实现
吸顶效果的实现主要依靠的重写onDrawOver(c: Canvas, parent: RecyclerView, state: RecyclerView.State)这个方法来实现,这个方法回调回来的Canvas对象所绘制的内容是处于 Item 的上层的,一种遮罩的感觉。同时也会返回 recyclerView对象,通过它可以获取 item 的位置和 item 的 View,通过parent.findViewHolderForAdapterPosition(firstCompleteVisibleIP)?.itemView来获取 View 对象,这样可以根据想要操作的 Item 来定制化吸顶的效果。代码示例:
1 | override fun onDrawOver(c: Canvas, parent: RecyclerView, state: RecyclerView.State) { |
日期得计算
Date获取年份、月份和日期得方法已经被废弃了,现在获取需要使用Calendar类,具体如下
1 | val cal = Calendar.getInstance() |
2020/03/19
关于 ImageFilterView 中圆角的计算公式
从源码中知道ImageFilterView是这样计算圆角的,所以拿到设计稿的 dp 时,反推就知道该设置多少的roundPercent
1 | float r = (float)Math.min(w, h) * ImageFilterView.this.mRoundPercent / 2.0F; |
2020/03/23
关于 CoordinatorLayout 和 MotionLayout 结合使用的简单总结
需求是实现一个个人主页,吸顶加列表的样式,那么整个 xml 的结构如下
1 | -- CoordinatorLayout |
坑记:
需要
Content随着AppBarLayout移动,需要在Content的 xml 中的顶级 View 设置app:layout_behavior="@string/appbar_scrolling_view_behavior"属性,其值为:<string name="appbar_scrolling_view_behavior" translatable="false">android.support.design.widget.AppBarLayout$ScrollingViewBehavior</string>如果需要更复杂的滑动联动效果,就需要自己自定义这个
behavior了如果需要去除
AppBarLayout 的阴影,需要设置app:elevation="0dp"使用的是app而不是android如果
Content中存在列表,设置联动的形式,可以设置CollapsibleToolbar 的app:layout_scrollFlags="scroll|exitUntilCollapsed"这个属性的几个标签详解:Android 详细分析AppBarLayout的五种ScrollFlags
2020/03/28
关于使用 MotionLayou实现个人的顶部吸顶效果
目前采用的改变单一一个 view 控件在初始状态和终止状态约束的不同,然后由代码进行控制,动态设置背景的高度,静态 xml 的布局如下
1 |
|
对应的 scene 描述文件
1 |
|
这个描述文件中,主要操作是改变了底部可滑动布局在不同状态的约束,开始时,约束于顶部的 header 信息布局,这样能保证信息的完整显示,在终态下,需要吸顶顶部的导航栏。动画效果具体的控制则是由KeyFrameSet控制。
背景图片的大小和状态栏的适配,需要在代码中获取到状态栏的高度后,再去更新相应的约束
1 | val statusBarH = Resources.getSystem() |
2020/04/07
关于 Kotlin 中的函数引用多个参数时的用法
1 |
|
2020/04/20
聊天页面的LayoutManager优化
需求:聊天页面中是最新的在底部显示,但是没有达到一屏的依然会显示在顶部,所以只有重新写 layoutManager来动态适配这样的规则,在搜索了一番后,发现 LinearLayoutManager 中有一个 onAnchorReady 的空方法提供给开发者扩展
通过查看源码发现,linearlayoutmanager中主要通过AnchorInfo的辅助类来实现item的布局的起点位置和方向。在layoutChildren的方法中,开始调用真正布局的fill方法之前会先回调onAnchorReady方法。所以我的思路是可以重写这个方法,修改anchorInfo变量中的位置信息达到动态改变布局方向的要求。
1 | override fun onAnchorReady( |
在这个方法中,通过recycler中拿到所有的item进行测量,并和从外传入的参数进行比较(因为最大的可展示高度应该是由外部决定的)。
但是仅这样处理发现并没有效果,追踪了代码发现在布局代码的后面还存在一个修正的方法,源码如下
1 | // changes may cause gaps on the UI, try to fix them. |
它依然会根据mStackFromEnd这个变量的值来动态修正。所以导致我们改变的锚点信息没有用(这个变量的赋值在代码中除了手动设置以外,也是由anchorInfo的变量得出来的)
所以在修改anchorInfo的同时,还需要修改这个变量。带来的另一个问题是,这个变量的 set方法时,会检查当前的状态是否是正在layout,会调用requestLayout()方法
1 | /** |
而我们想要的,仅仅是修改mStackFromEnd这个变量的值。所以在我们的代码里,重写了这两个方法,如果是因为我们的测量而手动设置mStatckFromEnd时,上面的两个方法都不需要调用。完整的代码如下
1 | // 因为 anchorInfo 方法的可见性为 default(对应 kotlin 中的 internal),所以需要同包名 |
2020/04/22
kotlin中的函数引用多参数使用
对于kotlin中函数引用的更多用于,如果只是一个参数,像之前那样使用就可以了,如果存在多个函数呢,并且存在返回值,比如以下这样的场景
1 | fun safe(a:Int?, b:Int?, block:(a:Int, b:Int ) -> Unit){ |
这样其实也没有问题,但是可以有更优雅的写法,那就是利用函数引用。我们可以看看,后面的block本质上是一个高阶函数,高阶函数其实是一个函数对象。而函数引用,本质上也是将引用指向一个具有和函数功能相同的对象。这个有点抽象,从实际的例子中看看,首先看怎么用的
1 | // 创建一个和block一样功能的函数 |
因为这个function的函数接收两个参数,而block这个高阶函数,也需要接收两个参数,但是在这里,他们是两个东西,一个是函数,一个是函数类型的对象,那么怎么把函数变成函数类型的对象呢,使用**:: ** 就可以将一个函数变成具有和函数功能一样的对象了,这就是函数引用。也就是说::function这样操作后,和block是一样的类型了。
2020/04/27
两个文本的自适应省略布局
UI的一个需求,显示两个文本,文本的宽度都是自适应,但是当两个文本宽度加起来达到最大时,有不同的表现:
1.如果两个文本都超长,则都显示省略号
2.如果一个超长,一个很短,那么短的完整显示,长的省略显示
这里我们用于设置文本的控件是一个自定义控件,内部持有一个textView,所以如果只是简单的将控件的宽度设置为wrap_content的话,后面一个的显示会导致前面的文本被挤压。开始尝试了使用LinearLayout和ConstrainLayout,但是两个文本控件的宽度都设置为wrap_content时,父控件在onMeasure其实都是无法根据现有的约束来设置文本控件中的textView是否需要省略的。
所以我采取了反向思维,父布局使用LinearLayout,将两个文本控件按照比重平分,然后在代码中,获取文本控件的textView判断是否达到了省略,如果没有,重新设置文本控件的属性为warap_content,这样根据已经计算好的结果可以重新设置一次。比较耗费性能的就是需要重新requestLayout一次。xml代码就不贴了,就是线性布局中,两个自定义的文本控件按照比重平分。主要是代码部分的设置:
1 | //重新布局,根据是否省略来重置tagView的属性 |
Travis CI 安装指定版本的Node.js
修改.travis.yaml文件中的配置:
1 | language: node_js |
2020/04/30
###实现输入限制仅为中英文加数字和不同字符的计算
比较优雅的做法是给editText设置filters,进行过滤,这样能直接限制输入的回调。要限制为中英文的输入,和计算中英文中每个字符所占的个数的不同时,在filters中会比较轻易的实现。首先,对刚刚输入的字符串,进行过滤,这样能保证接下来的处理仅包含需要处理的字符串,这一步的操作通过正则表达式来实现。
1 | private val chinesePattern = Pattern.compile("[\u4e00-\u9fa5]+") // 判断中文 |
通过findAll先进行输入字符串的过滤
1 | val filterText = StringBuilder() |
###自定义的GsonBuilder进行三方解析
gsonBuilder可以进行自定义的typeAdapter注册,这样能够进行一些可见性受限制的类的序列化,主要使用的是gson中的JsonSerializer和JsonDeserializer这两个接口。通过实现他们,就能将自定义的类型进行 toJson和fromJson的操作了。这里使用一个实例来展示如何使用:
1 | class TextMessageSerializer : JsonSerializer<ReEditMsgCacheBean> { |
ReEditMsgCacheBean是我们自定义的类,里面包含一些三方库的实体,没有默认构造函数实现的时候。这个类就统一将整个对象转为String字符串。
接下来就是解析了
1 | class TextMessageDeserializer : JsonDeserializer<ReEditMsgCacheBean> { |
2020/05/06
Mac下设置JDK环境
首先到官网下载对应Mac的jdk,下载后解压缩会得到一个文件夹。然后使用命令行工具打开编辑~/.bash_profile文件,如果没有就在~/目录下创建一个touch .bash_profile,输入以下的代码
1 | # JAVA_HOME的路径为刚刚解压的压缩包路径,到Home文件夹这一层 |
然后执行
1 | source ~/.bash_profile |
来检查是否配置正确。
2020/05/07
背景高亮渐变的动画设置
很多时候需要背景高亮然后颜色渐变显示,使用ArgbEvaluator()的插值器
1 | val evaluator = ArgbEvaluator() |
透明度表格
2020/05/11
关于equals()和==
Java中
首先明确,在Java中,==比较的是对象的首地址,而equals是`Object的方法,比较的也是首地址,但是很多类对这个方法进行了重写,就可以是比较的内容,比如String类。示例如下:
1 | String str1 = new String("a"); |
Kotlin
在Kotlin中,== 为equals()方法,而=== 等于Java中的==。
扩展
上述示例中的特殊情况1是因为有字符串常量生成的变量,字符串常量是JVM为了减少频繁创建字符串带来的性能销毁所所做的缓存。
1 | val str1 = "HelloWorld" |
关于String a = String(“xyz”)创建了多少个对象的讨论
2020/06/01
Android Studio 4.0 无法运行debug包的报错处理
在gradle.properties中添加
1 | android.injected.testOnly=false |
Android 报错1.1.8生成的字节码无法内联到1.1.6生成的字节码中
解决方案是在AndroidConfig中添加jvm相关的参数
1 | kotlinOptions { |
还需要在AndroidStudio中修改项目的编译JDK版本为1.1.8
2020/06/27
Mac上使用MAT分析内存
首先在官网上下载工具传送门。
该工具官网说最低需要JDK1.8的支持,所以需要在mac上安装JDK1.8的环境,网上下载好JDK1.8安装好就可以了,使用java -version命令来验证是否安装成功。
使用MAT工具需要打开app的包内容,到里面的/MacOs目录下手动开启工具。从AndroidStudio的Profiler中直接导出的hprof文件是不能直接使用的,需要到Android的/SDK/platform-tools/目录下执行
1 | ./hprof-conv /Users/griee/Desktop/Log/profs/5.hprof /Users/griee/Desktop/Log/profs/5-new.hprof |
来进行转换,前面是刚刚从Profiler中导出的文件地址,后面是需要导出的文件地址
2020/09/07
关于Paint中getFontMetrics方法所获取的数据
这个方法最后调用的是native层中的方法进行测量的, 在线地址
首先是Java层的源码
1 | /** |
以下是native中对应的方法,会先去根据传入的Paint对象来获取文字相关的数据,再把计算的数据设置到java层刚刚传入的metrics对象中。
1 | static jfloat getFontMetrics(JNIEnv* env, jobject, jlong paintHandle, jobject metricsObj) { |
再看看具体计算的方法:
1 | static SkScalar getMetricsInternal(jlong paintHandle, SkFontMetrics *metrics) { |
2020/10/20
MacOS中,下载的应用打开时,提示无法打开的修复方案
该情况可能是应用的压缩包在加压缩的时候破坏了应用的权限,所以可以点击应用,右键显示包内容,然后找到MaxOS文件夹,这个时候在命令行中执行命令chmod +x /User/xxxx/xxx/xx.app/Contents/MacOS/xx.app,修改了应用的权限后,就可以打开了
利用GitHub+jsDelivr+PicGo构建免费的图床
这里有一篇文章有基本的教程传送门,但是里面有一点细节没有说,那就是如果不需要发布release版本来控制图片资源,在PicGo中设置自定义Url的时候需要在仓库名后加上分支的名字,如xxxxx/Github用户名/图床仓库名@仓库分支/路径,而且仓库需要是Public状态,这样才能访问到我们放在仓库中的资源,否则会一直报错failed to fetch xxxx,。
2020/10/31
关于Kotlin中的排序
sort()方法是升序排序,sortByDescing()是降序排序,如果需要多个条件来排序,可以使用Compartor来辅助排序
1 | list.sortWith(Compartor{ o1, o2 -> |
Kotlin中二维和三维数组的初始化
1 | val two = Array<IntArray> { IntArray(2) } |
##2020/12/30
git fatal: refusing to merge unrelated histories 解决方案
在merge或者rebase中,出现该错误是因为两个分支没有取得联系,解决方案是在命令后面增加--allow-unrelated-histories,如
1 | git merge master --allow-unrelated-histories |
git 修改初始化时默认分支名称
1 | git config --global init.defaultBranch main |
2021/02/24
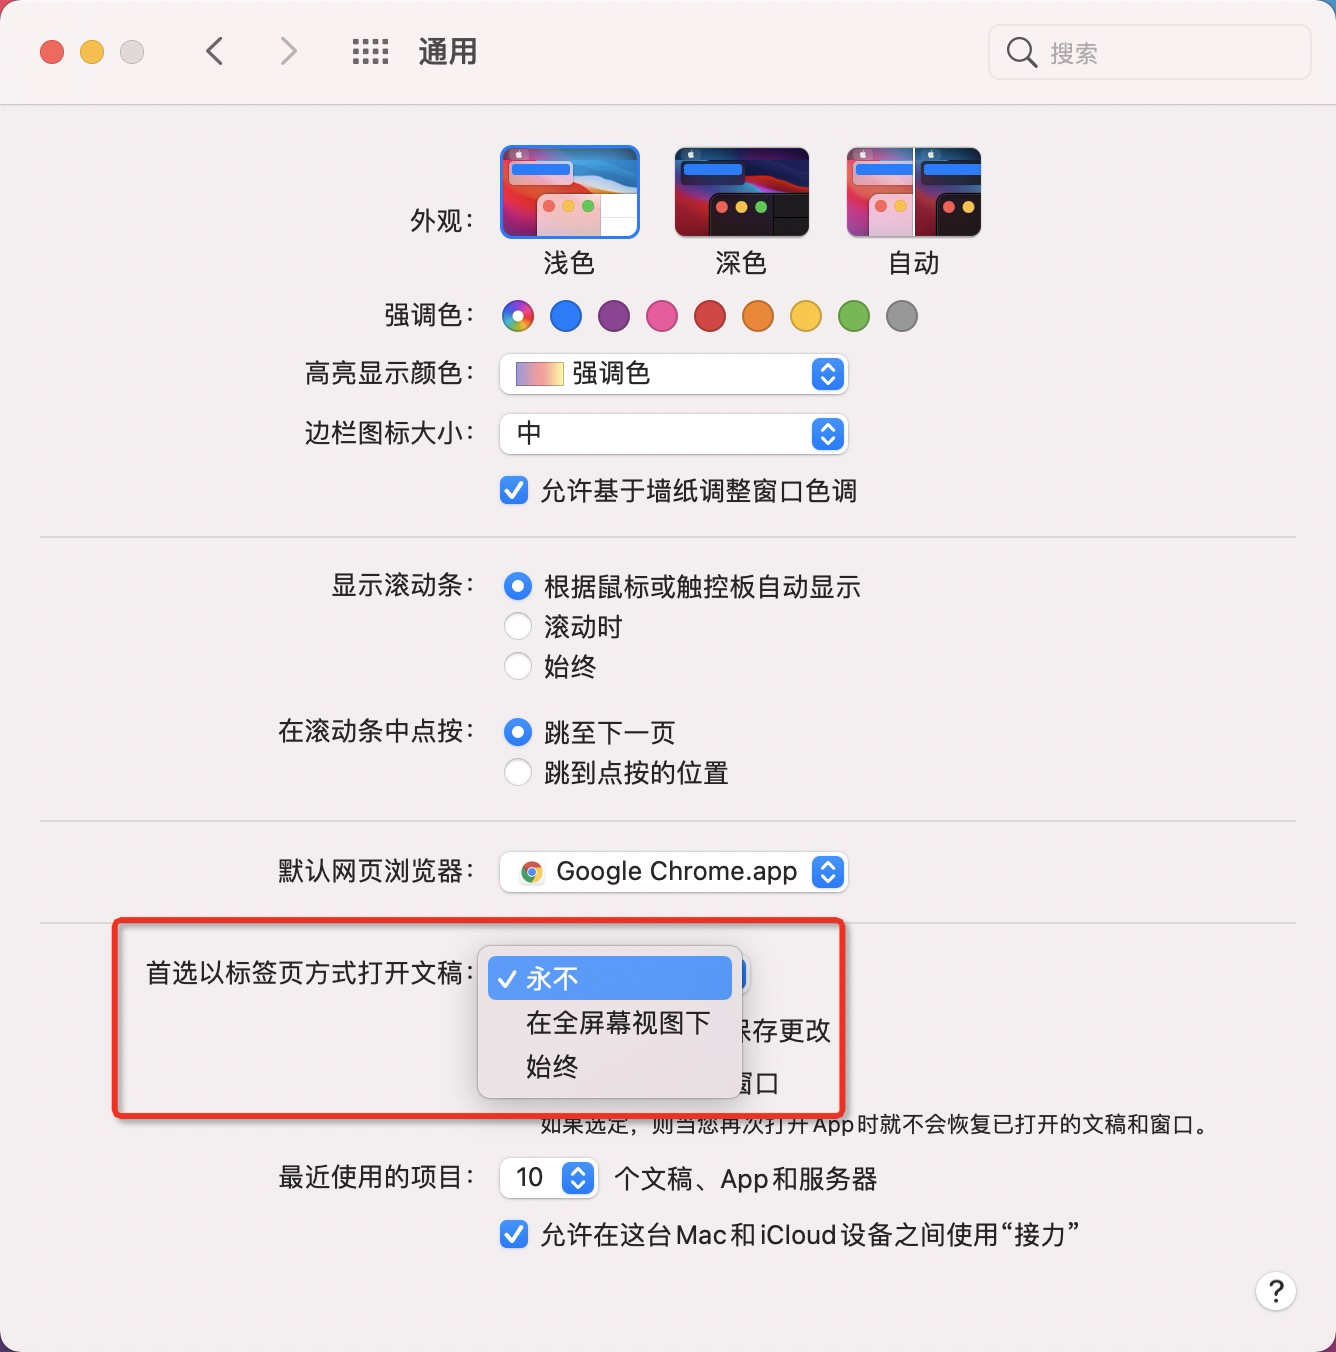
MacOS 11.1 设置标签页管理
在系统偏好设置->通用->标签页管理中将选项设置为永不
Gitlab配置ssh时,一直无法连接远端服务器的原因
- 没有
known_host,如果是缺少这个,在执行clone命令后,会出现一个提问,需要手动输入yes,这样就会将对于的ip新增到known_host中。 - 使用
ssh代理,执行命令ssh-add xxx/xxx/.ssh/id_rsa,这样将生成的私钥添加到代理中。 - gitlab有对秘钥长度的要求,默认生成的秘钥长度是1024的,需要2048以上的。所以生成公钥的命令需要添加长度参数
ssh-keygen -t rsa -b 2048 -C "email@example.com" - 如果生成邮箱的公钥不成功,就生成一个用户名的公钥,用户名在登录时的名称。生成多个公钥的命令是
ssh-keygen -t rsa -b 2048 -C "name" -f xxx/xxx/.ssh/name,这样在xxx/xxx/.ssh文件夹下面就会生成name和name.pub。这个地方,一般都是有官方文档的,按照官方文档的操作就可以,因为不同的版本可能有不同的配置需要
最后进行测试ssh -T git@gitlab.com,出现successful就表示成功了。
tips:Mac中复制的命令
pbcopy < ~/.ssh/id_ed25519.pub
2021/02/25
The application could not be installed: INSTALL_FAILED_TEST_ONLY 错误
在gradle.properties中添加android.injected.testOnly=false
2021/03/01
- 编译新项目时,出现app的
gradle有NoSuchMethod之类的错误,大概率是gradle插件版本的问题,在root的gradle中修改com.android.tools.build:gradle的版本就好了 SSL peer shut down incorrectly错误大概率的是仓库的问题引起的,添加maven { url 'http://maven.aliyun.com/nexus/content/groups/public/' }
2021/03/03
- 使用
merge标签的时候,预览的属性是tools:parentTag="XXXLayout" - 使用反射构建特定的参数的构造函数时,通过指明构造函数的类型来实现
MyTextView::class.java.getConstructor(Context::class.java, String::class.java).newInstance(this as Context, "Hello"),如这个是一个自定义view的自定义构造函数。 - 对于
release分支的合并需要在gitlab中提交pr进行review 和 merge。
2021/03/05
clashX配置自定义的域名,在控制台中查看你访问的网站的域名后,直接复制到本地配置的
.yaml文件中生效就行了,之前配置没有生效是因为域名配置出错了。在
github actions的yaml脚本中,可以根据条件来检查是否需要执行整个脚本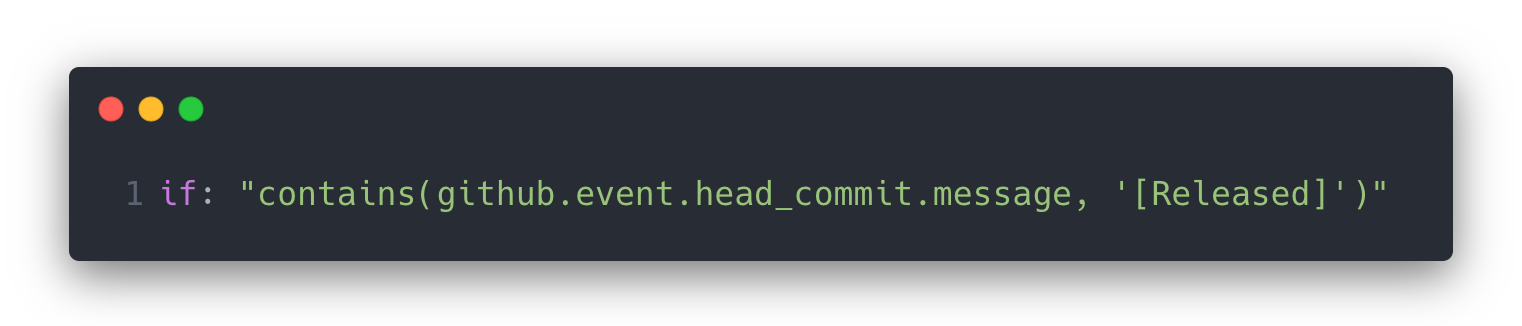
如上,这句是配置到
yaml中的,当本次commit信息中包涵了**[Released]**的字符串,才会执行后续的脚本
2021/03/09
优化编译的速度配置
1
2
3
4
5
6
7
8
9
10
11
12
13
14
15
16
17
18
19
20
21
22
23
24
25# custom Android Studio properties
# 开启gradle并行编译,开启daemon,调整jvm内存大小
org.gradle.daemon=true
org.gradle.configureondemand=true
org.gradle.parallel=true
org.gradle.jvmargs=-Xmx4096m -XX:MaxPermSize=1024m -XX:+HeapDumpOnOutOfMemoryError -Dfile.encoding=UTF-8
# 开启gradle缓存
org.gradle.caching=true
android.enableBuildCache=true
# 开启kotlin的增量和并行编译
kotlin.incremental=true
kotlin.incremental.java=true
kotlin.incremental.js=true
kotlin.caching.enabled=true
kotlin.parallel.tasks.in.project=true //开启kotlin并行编译
# 优化kapt
kapt.use.worker.api=true //并行运行kapt1.2.60版本以上支持
kapt.incremental.apt=true //增量编译 kapt1.3.30版本以上支持
# kapt avoiding 如果用kapt依赖的内容没有变化,会完全重用编译内容,省掉最上图中的:app:kaptGenerateStubsDebugKotlin的时间
kapt.include.compile.classpath=false
2021/03/10
处理前后台的判断标志
1
2
3
4
5
6
7
8
9override fun onTrimMemory(level: Int) {
super.onTrimMemory(level)
// TRIM_MEMORY_UI_HIDDEN是UI不可见的回调, 通常程序进入后台后都会触发此回调,大部分手机多是回调这个参数
// TRIM_MEMORY_BACKGROUND也是程序进入后台的回调, 不同厂商不太一样, 魅族手机就是回调这个参数
if (level == Application.TRIM_MEMORY_UI_HIDDEN || level == Application.TRIM_MEMORY_BACKGROUND) {
NormalDialogScheduleUtil.setHoldLaunchState()
}
}
2021/03/11
ssh-add -K ~/.ssh/name将代理添加到钥匙串中,这样每次重启都不要手动添加代理到ssh中在
kotlin中,For循环关于continue和break的效果,如果在For循环后添加标签并返回,实现的是continue的效果。要达到break的效果,需要在For循环外加一层dsl的标签,然后return外层的标签,伪代码如下: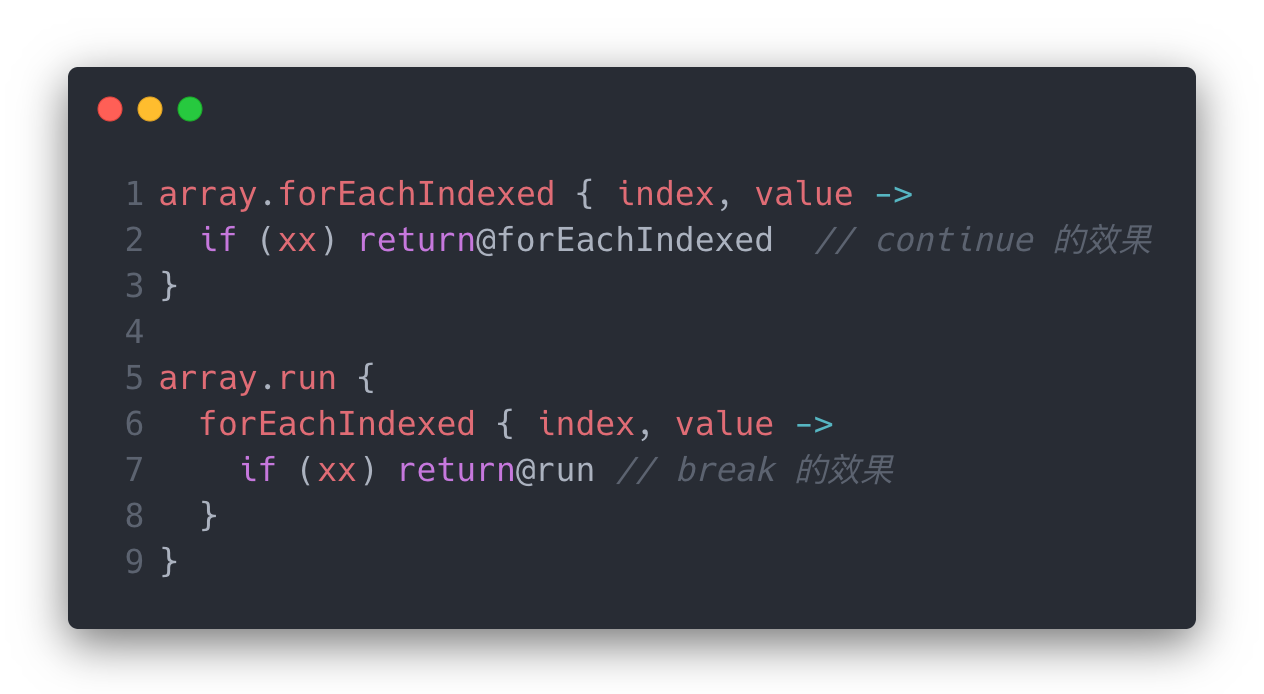
Android Studio配置
gradle的内存1
2
3
4
5
6
7
8
9
10##开启守护线程
#org.gradle.daemon=true
##设置jvm内存大小
#org.gradle.jvmargs=-Xmx2048m -XX:MaxPermSize=512m -XX:+HeapDumpOnOutOfMemoryError -Dfile.encoding=UTF-8
##开启并行编译任务
#org.gradle.parallel=true
##启用新的孵化模式
#org.gradle.configureondemand=true
##开启 Gradle 缓存
#org.gradle.caching = trueIt is currently in use by another Gradle instance 错误的解决方案
find ~/.gradle -type f -name "*.lock" -delete适配不仅仅考虑设备,还有系统版本。
UI的尺寸是不是严格按照ui上传。每次需要问清楚,UI对于手机和平板,竖屏和横屏都要考虑!!
MacOS重启后,ssh-add 代理失效的方案·
上诉方法不管用了,可以使用macOS自带的automator软件
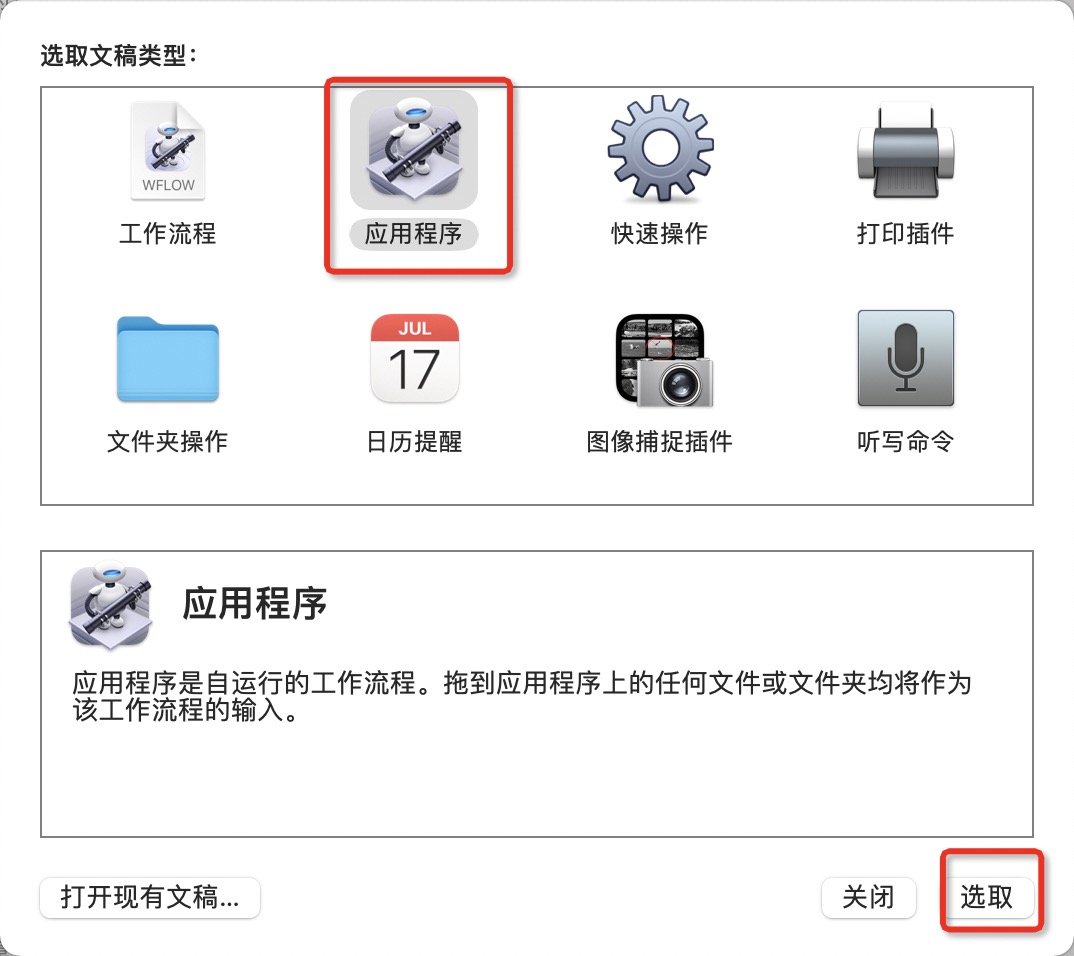
然后选择运行shell脚本,添加ssh-add添加代理的命令。
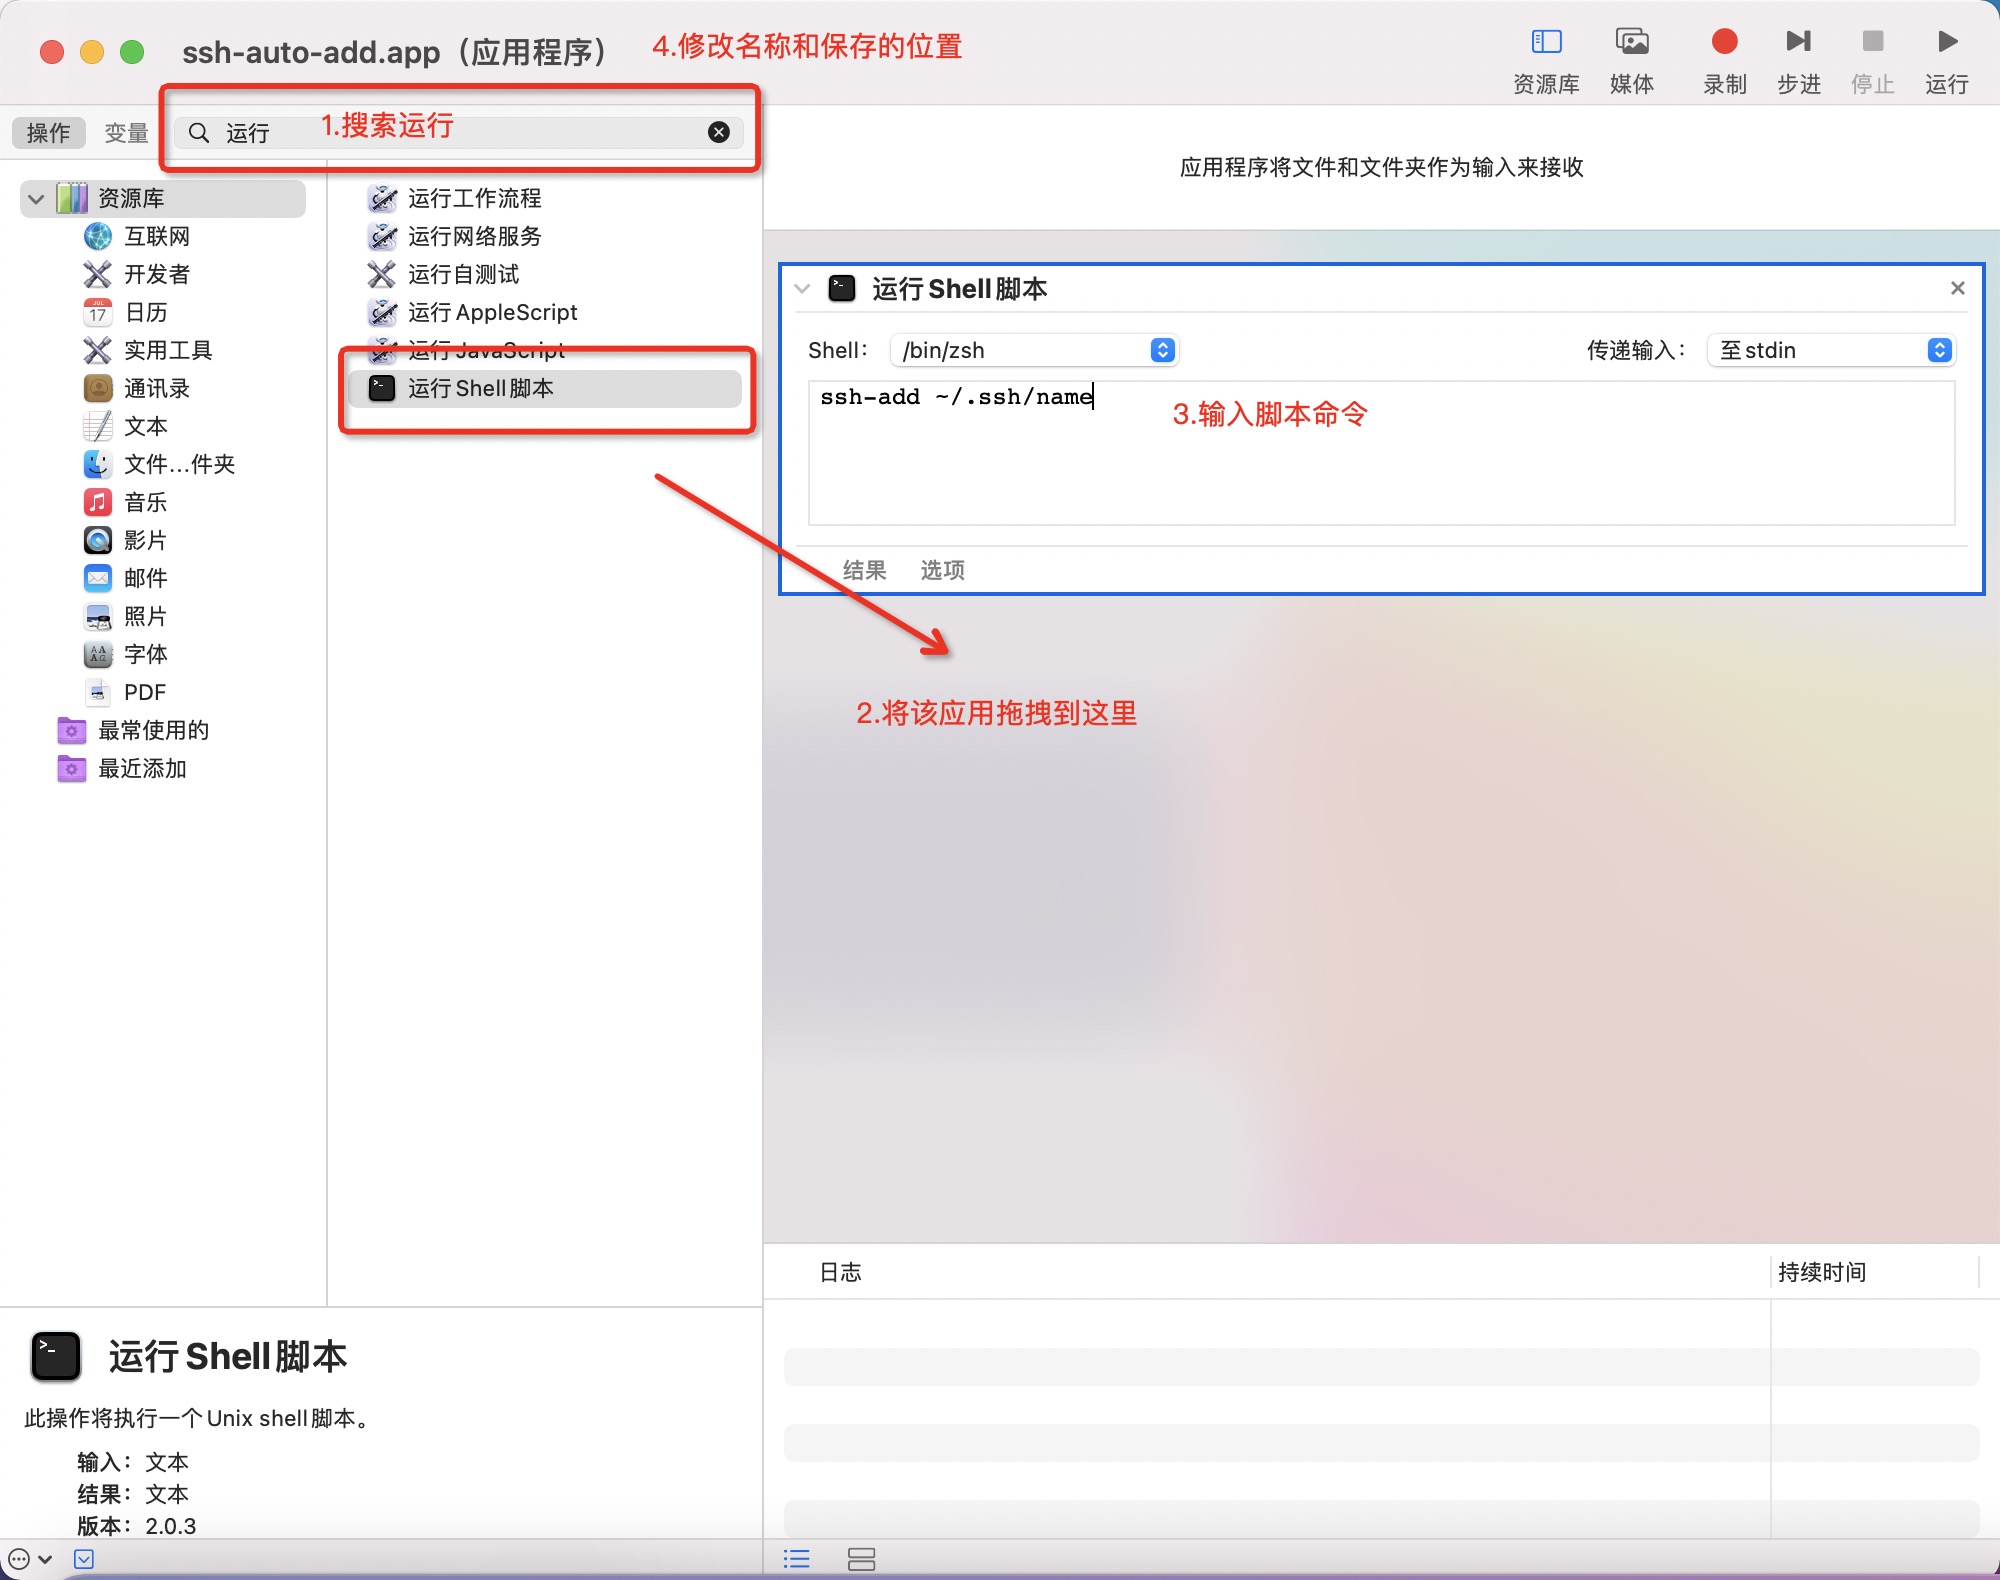
保存好了app后,在系统的偏好设置中选择用户与群组->登陆项,将刚刚生成的app添加到开机启动中。
这个方案还可以配置在Finder中打开终端
2021/03/12
- 代码中存在除法的逻辑时,需要检查除数是否为0的情况,否则会报错的。
- Uri的url需要判断null,在魅族5.0的设备存在崩溃的问题。
2021/03/14
ssh多配置
先按照网站配置教程生成对应的公钥秘钥,生成方法在前面;
在
~/.ssh/目录下生成一个config文件,直接touch config,在里面编辑以下配置1
2
3
4
5
6
7
8
9
10
11
12
13
14# github
Host github.com
HostName github.com
PreferredAuthentications publickey
IdentityFile ~/.ssh/github
# 公司内网
Host xx.x.x.xxx
HostName git.xxxx.com
User xxxx
PreferredAuthentications publickey
IdentityFile ~/.ssh/name需要注意的是这里的
Host,如果是内网的gitlab,可以在内网的网站上通过开发者工具Network栏目查看内网的IP地址,填写在Host这里的,到这里,配置多个ssh已经完成了。HostName 填写公司内网的域名就行了,在浏览器上查看,如gitlab.xxxx.com下面的就是公司内网的,执行命令
ssh -T git@git.xxx.com,出现Welcome,XXX就成功了。如果提示需要输入密码,则说明没有配置正确,先试试:
ssh-add ~/.ssh/xxx/xxx将密钥添加到ssh中,使用ssh-add -l查看是否添加成功。还有可能存在需要配置多个用户的情况,比如公司项目和个人项目同时存在,我们之前一般是通过
--globl来设置全局的变量,所以需要先清除1
2git config --global --unset user.name
git config --global --unset user.email然后在
~/目录下创建两个配置文件.gitconfig-self和.gitconfig-work(没有后缀,直接touch命令创建就好了),分别配置不同的账号1
2
3[user]
name = xxx
email = xxx@163.com然后编辑
~/.gitconfig这个文件,这个文件是由git自动生成的。新增以下配置1
2
3
4[includeIf "gitdir:~/self-workspace/"]
path = .gitconfig-self
[includeIf "gitdir:~/workspace/"]
path = .gitconfig-work注意事项:第一,gitdir后面的目录必须是以/结尾;第二是两个目录不能有交集
Android 项目中使用ComposingBuild来构建多项目的依赖
先通过new Module创建一个新的lib
然后修改这个lib的build.gradle,如下
1
2
3
4
5
6
7
8
9
10
11
12
13
14
15
16
17
18
19
20
21
22
23
24
25
26
27
28
29
30
31
32
33
34
35
36
37
38
39
40
41
42
43
44
45buildscript {
repositories {
jcenter()
}
dependencies {
// 因为使用的 Kotlin 需要需要添加 Kotlin 插件
classpath "org.jetbrains.kotlin:kotlin-gradle-plugin:1.3.72"
}
}
apply plugin: 'kotlin'
apply plugin: 'java-gradle-plugin'
repositories {
// 需要添加 jcenter 否则会提示找不到 gradlePlugin
jcenter()
}
dependencies {
implementation gradleApi()
implementation "org.jetbrains.kotlin:kotlin-stdlib-jdk8:1.3.72"
}
compileKotlin {
kotlinOptions {
jvmTarget = "1.8"
}
}
compileTestKotlin {
kotlinOptions {
jvmTarget = "1.8"
}
}
gradlePlugin {
plugins {
version {
// 在 app 模块需要通过 id 引用这个插件
id = 'com.github.grieey.build-plugin'
// 实现这个插件的类的路径
implementationClass = 'com.github.grieey.buildplugin.BuildPlugin'
}
}
}修改setting.gradle,将
include ':lib'修改为includeBuild("lib")。重新构建就行了。
2021/03/15
- 在出现任何一个bug的时候,多考虑一些场景,不仅仅是客户端的问题,还有后端的兼容性。
- 当下次存在插桩的方式,可以参考一些设计,比如plugin或者register等等。
2021/03/17
- 代码的设计还是不充分,在设计普通测试和特殊测试的时候,应该用一套布局,设计为了两套
- textView对于标点符号,有自己的适配规则,可能不符合产品的排版需求
2021/03/22
- 新项目中,新增module可以直接在
Config.groovy中,直接修改配置,建立对应的目录就行了。
2021/03/24
It is currently in use by another Gradle instance 错误的解决办法
运行命令find ~/.gradle -type f -name "*.lock" -delete
2021/03/26
Android ActivityThread.reportSizeConfigurations causes app to freeze with black screen and then crash
这个崩溃是由于Android系统的BUG,引起的,短暂的做法就是在onResume中进行try catch。完美的解决可以通过hook方法,在运行到该方法时,进行替换为Android 10上面的方法。
2021/03/30
自定义View布局的问题
onLayout方法中,进行view的自定义布局时,位置是相对父view的数据,比如layout(0, 0, 1, 1)这样就是在左上角,从**(0, 0)到(1,1)**的一个位置。需要注意的是,drawRoundRect也是这样的
2021/04/03
页面重新绘制的问题
很多时候都会引起页面重绘制,如旋转屏幕等,所以在做动画时,尽量保证父布局不会动,全力的处理子布局的动画即可。这个时候使用属性动画可以真正的更新,而使用view动画会在重绘后还原。虽然使用ObjectAnimator也是真正的修改了位置,但是重新layout后会还原,但是ViewPropertyAnimator不会,两者的逻辑仍然需要查看和熟悉。
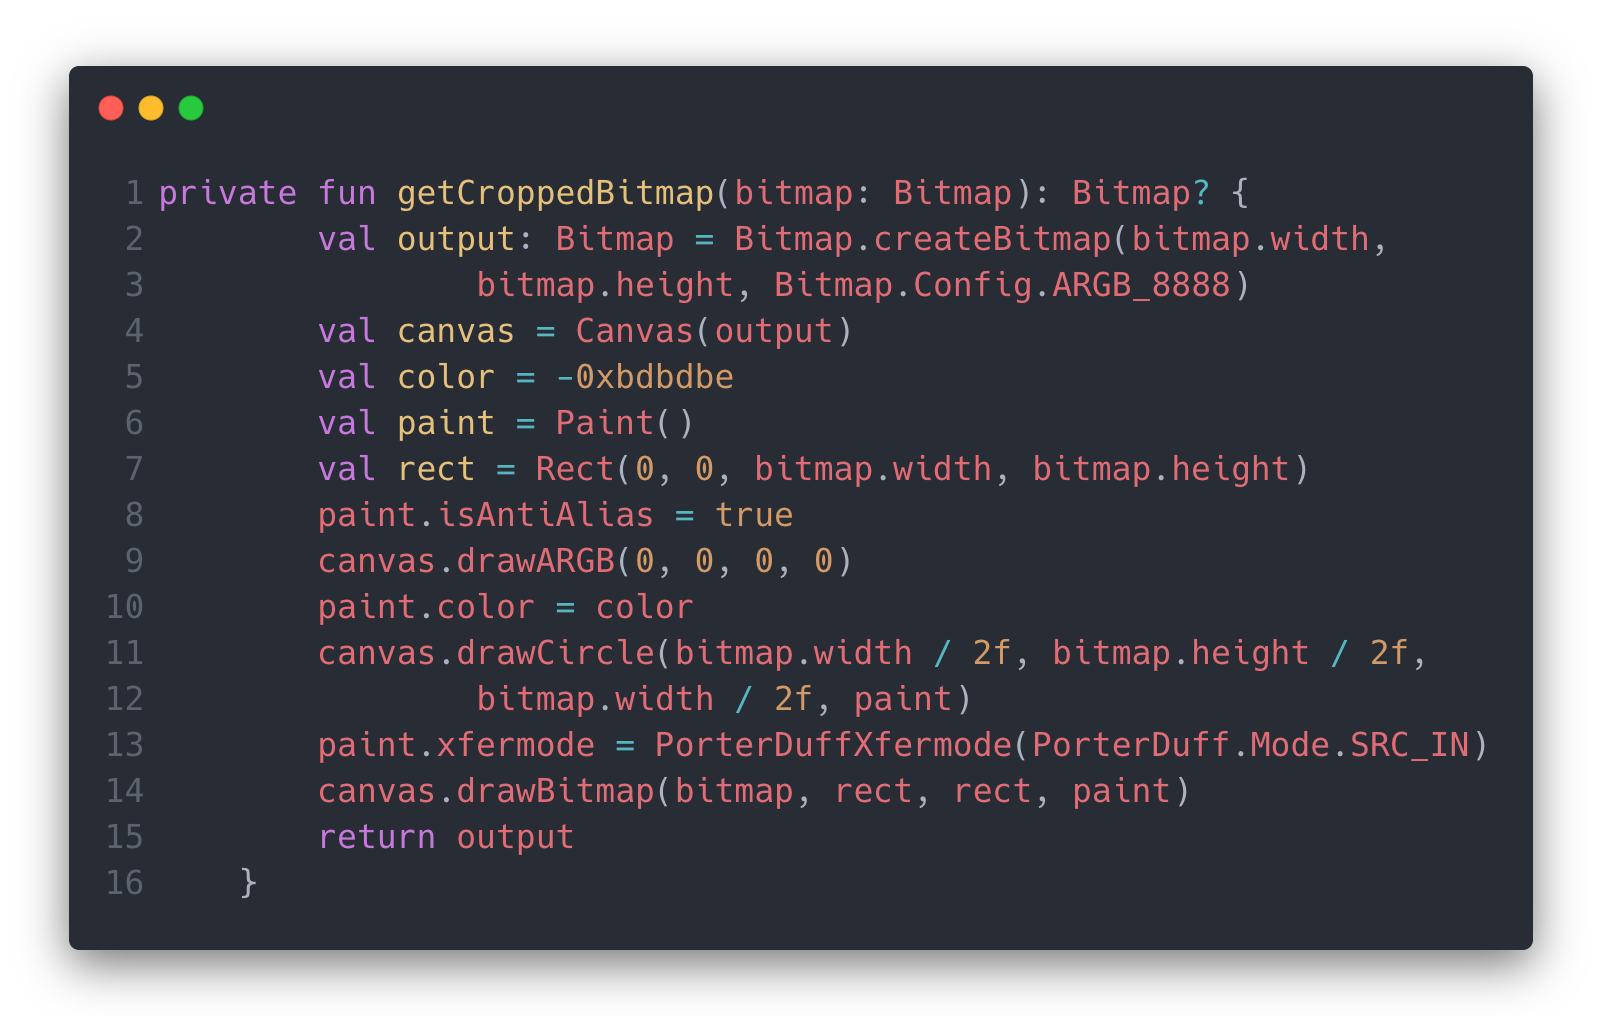
将Bitmap转换为圆形
Mac下安装Python3环境
- 安装
HomeBrew,使用命令/usr/bin/ruby -e "$(curl -fsSL https://raw.githubusercontent.com/Homebrew/install/master/install)",如果安装过程中出现了Connection refused的错误,可以尝试开启命令行的翻墙代理,这里用的clashX,可以直接复制翻墙命令export https_proxy=http://127.0.0.1:7890 http_proxy=http://127.0.0.1:7890 all_proxy=socks5://127.0.0.1:7890 - 执行
brew install python进行安装。 python3 --version可以查看版本,pip3是HomeBrew**版本的别称。- 在命令行输出日志中可以看到安装目录
Python has been installed as /usr/local/bin/python3
美化命令行
- 查看命令行工具
cat /etc/shells, 然后先看是不是设置的zsh,通过echo $SHELL查看,不是的话chsh -s /bin/zsh进行设置,然后重启终端; - 安装
oh-my-zsh的命令sh -c "$(curl -fsSL https://raw.githubusercontent.com/robbyrussell/oh-my-zsh/master/tools/install.sh)"(PS:同上面一样可能需要翻墙支持) - 下载主题
git clone https://github.com/bhilburn/powerlevel9k.git ~/.oh-my-zsh/custom/themes/powerlevel9k,
Python小知识
- SyntaxError: Non-ASCII character ‘\xe2’ 错误是编码的问题,在文件头上夹
# -*- coding: utf-8 -*解决
2021/04/08
- 所有的Kotlin与Java交互都是可为Null的,还有控件Id和Kotlin交互
2021/04/14
kotlin中实现注解限制范围
1 |
|
2021/04/20
curl是一种命令行联网的工具。
2021/04/23
Rust: Blocking waiting for file lock on package cache 解决方案
执行rm -rf ~/.cargo/.package-cache和rm -rf rm -rf ~/.cargo/registry/index/*
2021/04/27
Gradle权威指南中第4.5节的例子中,直接跑源码无法执行,实现自定义task可以用以下的方式实现
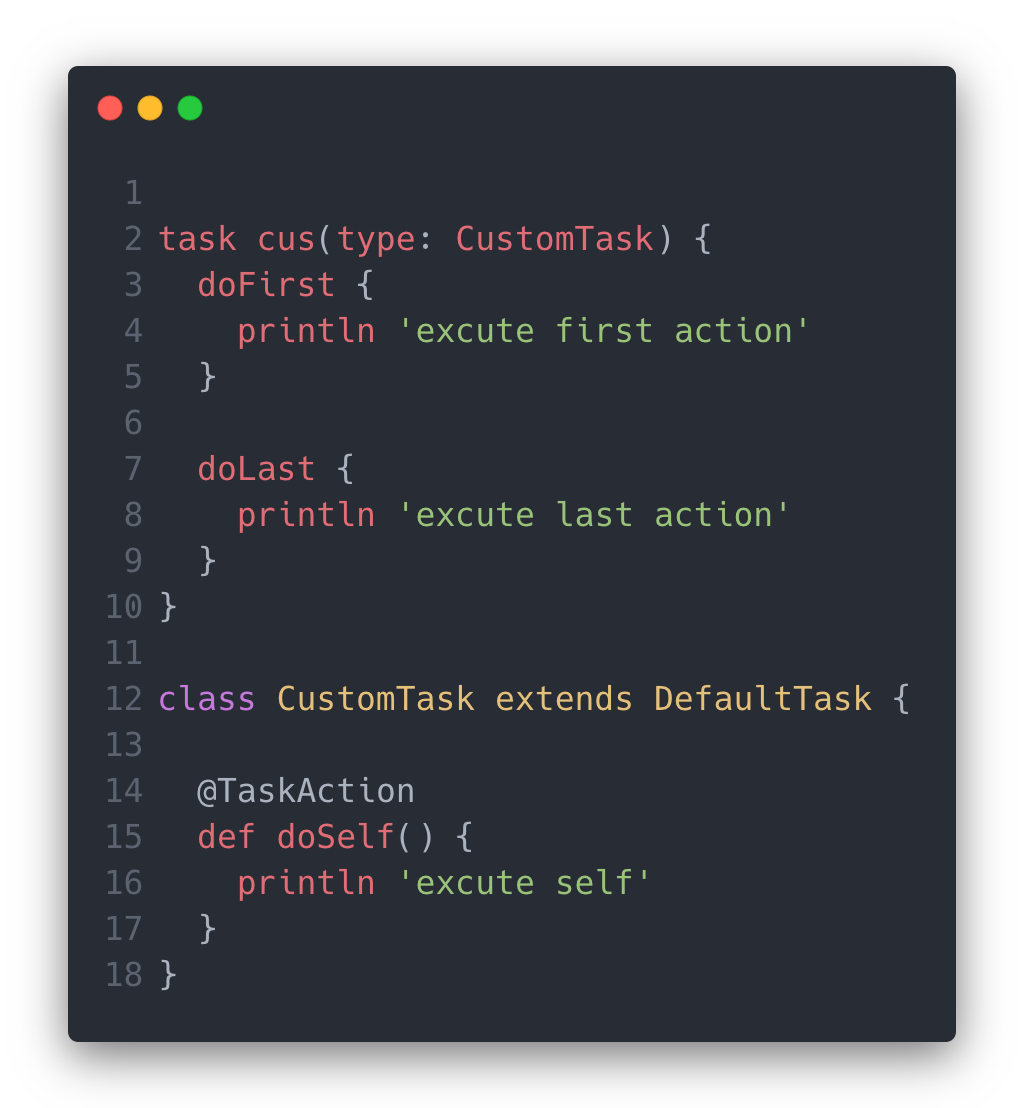
执行
./gradlew cus后,会依次打印excute first action , excute self , excute last action。
配置zsh
如果配置了zsh,有时候配置.bash_profile文件没有生效,需要在zsh的配置文件中添加代码,vim ~/.zshrc找到# User Configuration添加一行source ~/.bash_profile的代码,再执行source ~/.zshrc后,重启命令行工具就行了
2021/04/28
groovy转kts
setting.gradle的修改include的调用是方法,修改为include(":xxx")。创建task的方式
1
2
3tasks.create<Delete>("clean") {
delete = setOf(rootProject.buildDir)
}
配置plugin和buildSrc
在plugin目录下新建
buildSrc目录,依次建立以下文件1
2
3
4
5
6buildSrc
---src
---main
---kotlin
---Deps.kt
---build.gradle.src然后在
build.gradle.kts中至少需要配置plugins有kotlin-dsl,我的配置如下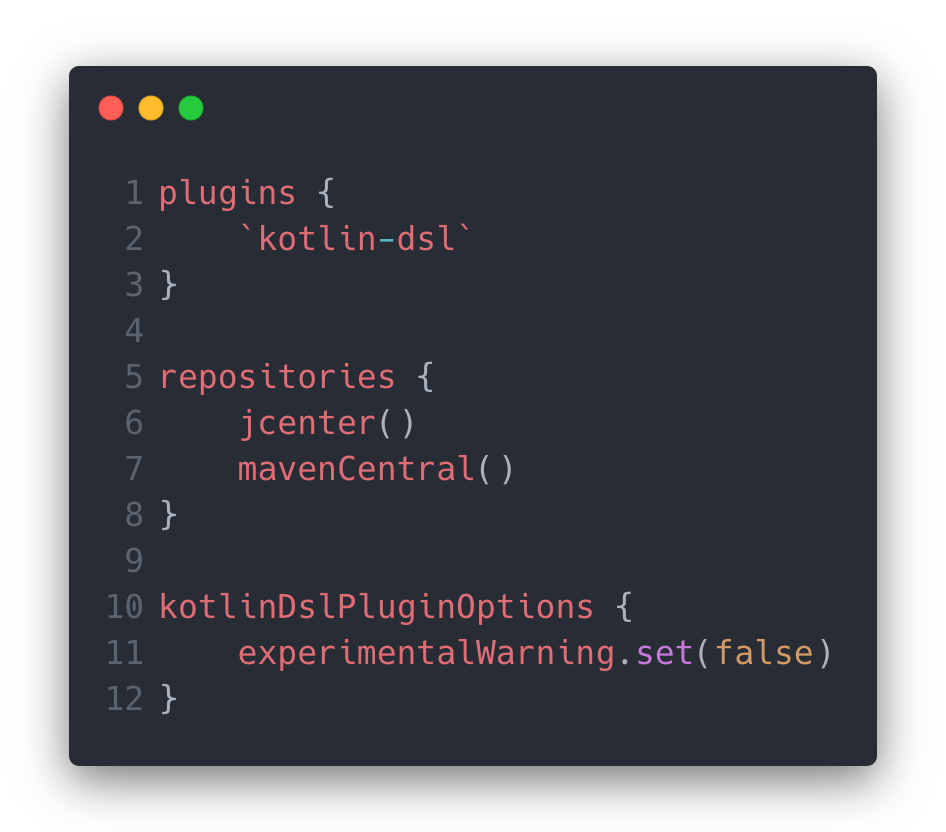
最后设置
kts配置plugin时,必须带上version,并不是所有的plugin支持单引号的语法,应该是需要配置version的就不支持,需要使用
id("pluginId") version ""这样的方式。
2021/05/07
手机连上chorme调试h5
chrome://inspect/#devices浏览器中输入这个就行了。
2021/05/12
Grid分割线写法
1 | override fun getItemOffsets( |
2021/05/19
deepLink项目是使用的yarn来配置的,用npm构建的。首先装npm,命令是brew install npm。用npm --version查看是否安装成功。- 然后在项目根目录下跑
yarn start。 - 用
ifconfig查看本机IP,在手机浏览器中访问即可测试。
DiffUtil的使用心得
areItemsTheSame方法返回的是数据源是否一致,一般用ID这种比较核心的来进行比较areContentsTheSame方法返回的是内容是否一致,也就是数据是否更新了局部,这个可以用于状态或者进度之类的局部更新getChangePayload用于局部更新,这个方法重写,才会对同一个数据源返回同一个ViewHolder,方便处理view上的一些状态。如果这样做,需要对ViewHolder中的所有状态进行控制,以防止复用。Lottie动画在RecyclerView同一个ViewHolder调用playAnimation无效,因为这个方法内部调用的isShown()一直返回的false。这也是官方库的一个Issue。解决方案是使用View.post{ playAnimation() },需要注意的是在post中需要判断view是否为null。
2021/05/26
ViewPager2中使用Recyclerview的adapter会抛出 java.lang.IllegalStateException: Pages must fill the whole ViewPager2 (use match_parent)
这里的解决方案是在创建ViewHolder时,需要设置LayoutParams都为MATCH_PARENT
2021/06/17
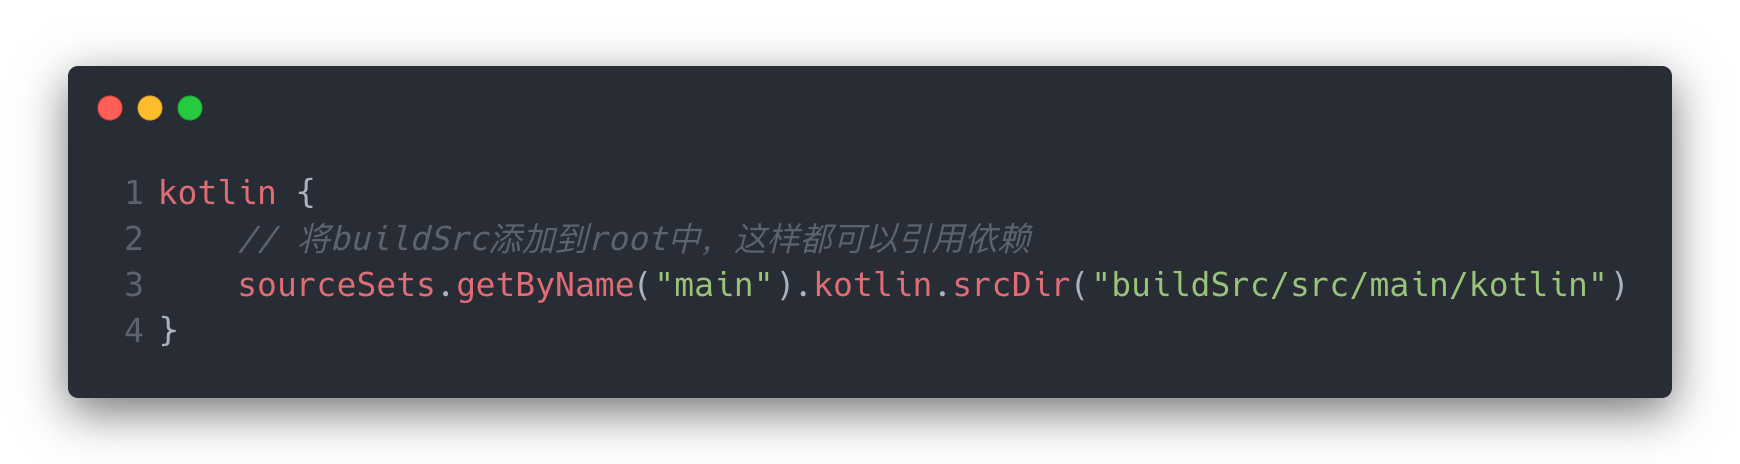
在rootProject的build.gradle的buildScript的block中无法引用buildSrc的问题
因为这个代码块的执行在当前的gradle之前,所以当前gradle中import的代码执行也在block之后,就无法引用到对应的类,解决方案是不使用import,在调用时直接使用全限定类名来调用即可
1 | buildscript { |
项目中新老项目的实现方案
在新项目中,将每个base、core相关的module单独打包,然后在老项目中统一依赖
2021/06/21
Fragment的构造方法私有后引发的报错
在Fragment方法中,有以下代码
1 | public static Fragment instantiate( Context context, String fname, |
这段代码在restoreState方法执行时,如果fragment的构造私有化后,会报错。因为代码中使用了反射来获取默认构造方法
2022/04/12
- github action执行的时候,是将在github workspace中,如果存在gitsubmodule的话,需要先clone下来,不然会找不到对应的项目;
- hexo有比较严格的npm版本要求,一定要对应。
2022/04/13
- 生成markdown需要的目录树,执行
npm install mddir -g,安装好了之后在指定目录执行mddir,然后在该目录会生成一个md文件,打开复制内容就好了;
2022/04/14
设置Android Studio在finder中直接打开项目,这样就不用每次都去as中打开了,操作减少了几步。
首先在
~/.bash_profile文件中为Android Studio打开项目添加别名1
alias as="open -a /Application/Android Studio4.2.1.app ."
然后
source ~/.bash_profile再打开苹果的自动操作软件,选择执行Apple Script,在右边窗口输入以下代码
1
2
3
4
5
6
7
8
9
10on run {input, parameters}
tell application "Finder"
set pathList to (quoted form of POSIX path of (folder of the front window as alias))
end tell
tell application "System Events"
do shell script "open -a /Applications/AS.app " & pathList
end tell
return input
end run保存为app。
然后在Application中找到Android Studio,右键显示简介,鼠标选择图标,复制,再到刚刚保存的App的位置,同样的显示简介,选中图标,粘贴。这样就把图标修改为as的了。
最后打开finder,顶部选择显示->自定义状态栏,把刚刚保存的App拖到工具栏,完成就可以了。
2022/04/20
使用Wrap时,无法登录,命令行中设置代理即可
1
2export https_proxy=http://127.0.0.1:7890 http_proxy=http://127.0.0.1:7890 all_proxy=socks5://127.0.0.1:7890
/Applications/Warp.app/Contents/MacOS/stableJava中使用反射的时候,调用
method.invoke(obj, objectName, functionName, paramStr),第一个参数obj可以传null,代表调用静态方法;
2022/04/21
Build was configured to prefer settings repositories over project repositories but repository 'flatDir' was added by plugin 'com.rocketx'类似错误的解决方案:将settings.gradle里的repositoriesMode.set(Repositoriest.FAIL_ON_PROJECT_REPOS)修改为repositoriesMode.set(RepositoriesMode.PREFER_SETTINGS);
2022/04/22
记录下第一次画的像素画

2022/05/05
- 约束布局中,
bais的计算规则是,控件左边距离约束控件的距离/(控件左边距离约束控件的距离+控件右边距离约束控件的距离)
2022/05/31
在Android11设备上报错
java.io.FileNotFoundException open failed: EEXIST (File exists) Android 11是因为Android11上进行了分区存储的设置,这个时候如果没有所有文件的访问权限,则在使用FileOutputStream打开文件时,会抛出上面的错误,(这个时候通过file.exist()返回的是false,无法判断这种情况)解决方案如下:在
Androidmanifest.xml文件中,声明android:requestLegacyExternalStorage="true"和<uses-permission android:name="android.permission.MANAGE_EXTERNAL_STORAGE"/>可以进行覆盖安装,但是一旦卸载,就会失效;不过可以一定程度减少用户的操作成本。在读取文件的地方,进行版本判断,如果是sdk大于了30的,需要用
Environment.isExternalStorageManager()判断应用是否有所有文件的访问权限,没有则直接跳转到设置让用户打开。1
2
3
4if (Build.VERSION.SDK_INT >= Build.VERSION_CODES.R && !Environment.isExternalStorageManager()) {
val permissionIntent = Intent(Settings.ACTION_MANAGE_ALL_FILES_ACCESS_PERMISSION)
startActivity(permissionIntent)
}
2022/07/20
- 配置hexo的PERSONAL_TOKEN,在Github的Setting中,选择DeveloperSetting中的PersonalAccessToken,中间选择Blog那个Token,重新生成一次,然后复制Token,在Blog的仓库中,选择项目的Setting->Secrets->Actions,添加一个HEXO_DEPLOY,已经有的话就Update,然后填入刚刚复制的Token就行了。
2022/08/01
- 使用
@Suppress("UNCHECKED_CAST")来屏蔽Lint的Unchecked cast警告。 - 针对文件中所有的警告忽略
@file:Suppress("UNUSED", "UNCHECKED_CAST")。
2022/08/04
- 设置环境变量set variable,不是把变量添加到PATH中,而是在
~/.bash_profile文件中设置一个变量,如需要设置ANDROID_SDK_HOME,则直接在~/.bash_profile中写入echo ANDROID_SDK_HOME=/usr/xx/xx/xx/Android/sdk即可。